Articles in this topic
Events on your website
Show your events on your website as teasers — one event or a list, each in four designs. Every event opens on its own event website, where guests read the details and book.
8 min read
Do you host events yourself — a wine tasting night, live music, a workshop? Then your website can show them as teasers: a photo, the title, the date and time, and a button. Two sections do the work:
- Event Details shows a teaser of one event.
- Event Programme shows a list of events: upcoming, past, or both.
Each comes in four designs, like the other sections. Whichever you use, a guest who clicks an event lands on the event's own website — the page made for that event, where they read all the details and book. Your website is the shop window; booking happens on the event's website.
The events themselves come from the Events page in your menu on the left — that is where you create an event, set its price and tickets, and add its photo and short description. The website editor only decides where and how they show.
The two event sections
| Section | What it shows | Good for |
|---|---|---|
| Event Details | A teaser of one event: photo, title, date, time, place, price, a short description and a button. | The next event on your home page, or a spotlight on one special evening. |
| Event Programme | A list of events. | An Events page, or a short teaser with a See all events button on your home page. |
To add one, click + Add Section and choose Event Details or Event Programme, then a design. See Add a section.
Good to know
Like some other sections, these two are part of plans that include the full website editor. A section with a small lock is not part of your plan.
Tip
The easiest start is a whole page: click + Add Page, choose Start with → Events page, and click Create. You get a ready-made Events page with a list of your events. See An Events page.
Where an event opens
Your website only shows a teaser of each event. The title and the button — in Event Details and in every design of Event Programme — open the event's own website: its own little website, or, if you haven't built one, the simple event page that every event has. That is where guests read all the details and book: tickets, registration, the waiting list. Your website never has a reservation form for events.
Good to know:
- At the top of the event's website, a link with your venue's name takes guests back to your website.
- An event whose own page is switched off still shows in a list, but without a link or button, because there is nowhere to open it.
- Links to events that guests saved or shared earlier, with an address on your website such as
/events/autumn-wine-night-7f3c2b1e, still work: they lead on to the event's own website. If the event is gone or no longer public, guests land on the page named in the address — or your home page. - Open parties (see Which events appear) open on their own website too.
A short list on your home page can end with a button under the events: choose a page under “See all events” button, for example your Events page, and change its text with Button Label. Choose No button to remove it.
Good to know
Events used to be able to open inside your own website. That is gone: every event now opens on its own website. See Event Details if you still have a section from that time.
Which events appear
An event appears on your website when all of these are true:
- Show on your website is switched on for the event. You find it in the event's settings in the Events page; a new event has it on. Switch it off for an event you want to keep off the website (a private tasting, for example).
- The event is confirmed (or already completed). Events that are only a request never appear.
- It belongs to the location you show. With several locations, choose the location under Data source — or switch on Show events of all locations in a list.
- Its own page is switched on. If it is switched off, the event still shows in lists but without a link, and it cannot be shown as a single event.
Cancelled events stay in the Upcoming list with a Cancelled badge until their date, so guests who booked can see it. In Event Details they show the badge too. Past lists never show them. Prefer not to show cancelled events in the list? Switch off Show cancelled events in the Event Programme section.
Open parties. A party that a client hosts at your place appears only if you switch on Include open parties in the list, and only when the party is confirmed, has not started, is open to everyone and is marked to show on your website. Such parties appear in Upcoming only, never in past lists.
Meetups of a series. A meetup appears on your venue's website only when Show on your website is switched on for it, and a new meetup starts with it off: it is listed on its series' website first. Switch it on in the meetup's settings in the Events page when you want it on your own website too. See The series website and its design.
Important
The events are read live. A new event, a sold-out event or a switched-off event shows on your website straight away, without publishing. The section's own settings — design, texts, which event — belong to your draft and go live when you click Publish. See Publish your changes.
Only one series
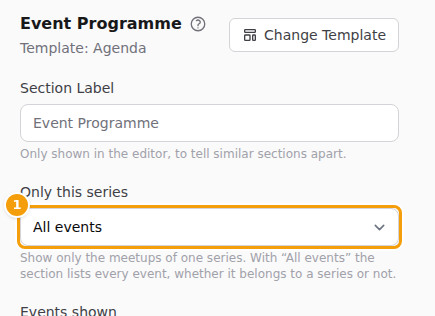
If your brand has event series, Event Programme and Event Details (when it shows The next event) have an extra select, Only this series (1). It starts on All events: the section lists every event, whether it belongs to a series or not. Choose a series and the section shows only that series' meetups. A brand without series does not see the select.
If you switch events off
When internal events are switched off for a location (see Switch events and series off), the website editor follows: the event sections cannot be added at that location (sections already on a page stay), the picker that links a menu item to an event is empty, and the template wizard leaves out the Events page. If the series are off, the series picker is empty.
Upcoming and past
- Upcoming means the event has not ended yet. An event that is on right now stays in Upcoming, with an On now badge, until it is over.
- Past means the event has ended.
- Each location uses its own clock, so an event at your other location in another time zone moves to Past at the right moment.
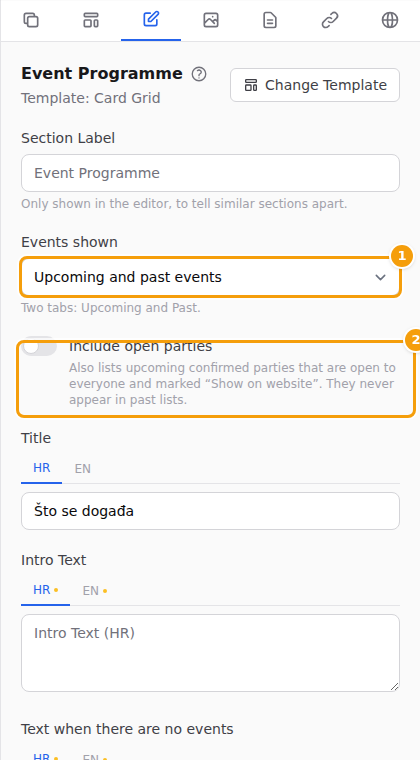
In Event Programme, choose under Events shown: Upcoming events, Past events, or Upcoming and past events. With both, guests see two tabs — Upcoming and Past. The Calendar design has no tabs: it shows past and upcoming months in one calendar, and past events look paler.
Event Details
Event Details is a teaser of one event. Choose the design when you add the section, or later with Change Template (see Choose a layout).
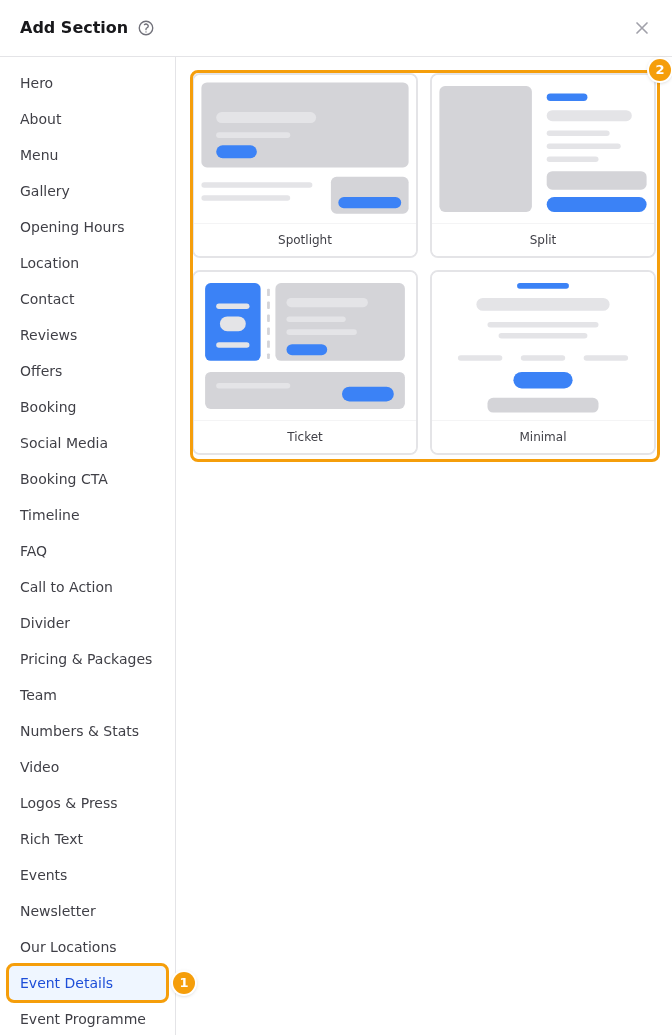
| Design | What it looks like | Without a photo |
|---|---|---|
| Spotlight | A wide event photo with the title, date, time, place and price on top, and a button. The description sits below. | A coloured panel, still easy to read. |
| Split | The photo on one side, and a panel with the title, date, time, place, price, description and button on the other. On a phone they stack. | The panel takes the whole width, with a date block. |
| Ticket | Looks like a ticket: a stub with the big date, a perforated edge and the details and button next to it. | Works the same — it needs no photo. |
| Minimal | Centred, text only: the date, the title, the description, a row of facts and a button. | Works the same — it needs no photo. |
Only Spotlight and Split show the event photo. You add the photo to the event itself in the Events page.
What guests see. The photo (in the two designs above), the title, the date and time, the place and the price, the short description, and a badge when it applies: Cancelled, On now, Ended or Sold out. The title and the button, Details & booking, open the event's own website. While the event's own page is switched off, the title is plain text and there is no button.
Which event. Under Which event choose:
- The next event — the next event that has not started yet, or else the one that is on now. When there is none, the section stays hidden on your website. Nice for the home page.
- A chosen event — always this event. Search and pick it in the list: upcoming events first, then past ones. Each entry shows its date, place and status. Under When the event is over choose Keep showing it (guests see it with an Ended or Cancelled badge), Show the next event instead, or Hide the section. If the chosen event is deleted or no longer shown on your website, the section is hidden and the editor tells you why.
With several locations, Data source decides which location's events the section uses.
Settings. Under Parts shown, switch off what you don't need: Show image, Show description and Show location name and address. Small heading adds a short line above the title, for example Next event, and Button Label changes the text of the button (leave it empty for Details & booking).
Good to know
An older section? Earlier, Event Details could show The event opened from a list. That choice no longer exists, because events now open on their own website. A section that still has it stays hidden on your live website, and the editor shows a warning: This section used to show the event a visitor opened from a list. Events now open on their own website, so it stays hidden on your website. Choose which event it shows, or delete it. Choose The next event or A chosen event, or delete the section.
Event Programme
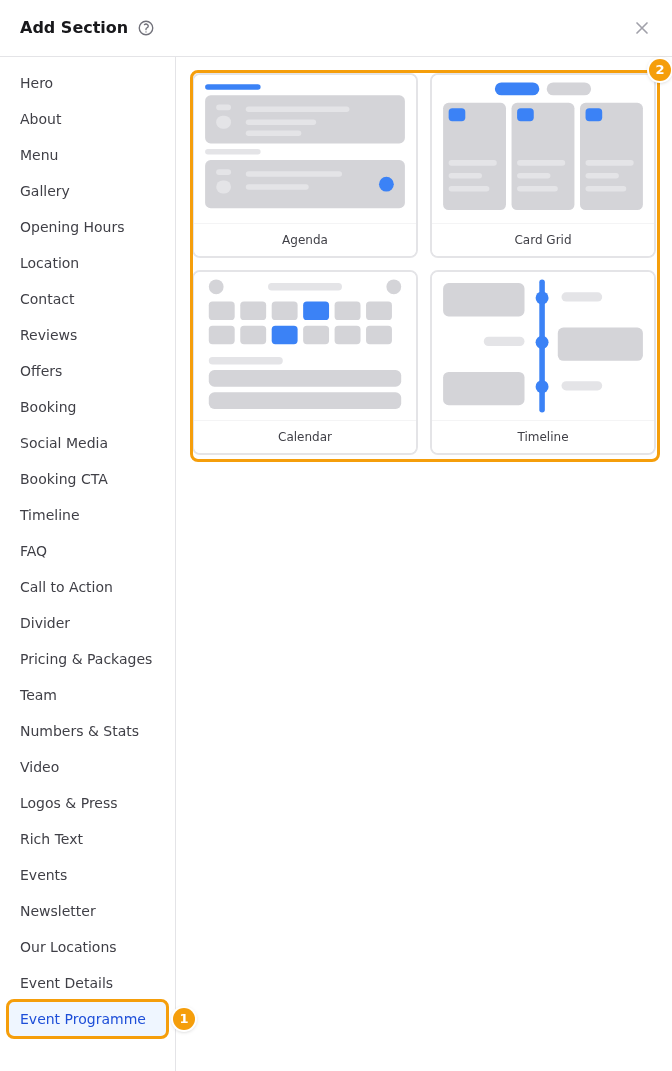
| Design | What it looks like | On a phone |
|---|---|---|
| Agenda | Grouped under month headings. Each row has the date, title, time, location (with several locations), price and badges. No photos or descriptions. | One column. |
| Card Grid | Photo cards with a date chip, title, time, price and badges. Without a photo: a coloured card with the big date. | One or two columns. |
| Calendar | A month grid. Days with events are marked; tap a day to see its events below the grid. | A compact grid with dots, and the list of the tapped day. |
| Timeline | A vertical line with dated entries, left and right in turn. | One column. |
Every entry opens the event's own website.
Settings you will use most:
- Events shown — upcoming, past, or both (see above).
- Data source — the location whose events to list. With more than one location you can also switch on Show events of all locations: every entry then shows its location.
- Include open parties — see Which events appear.
- Title, Intro Text and Text when there are no events — with language tabs. Left empty, the section uses a standard text in your guest's language.
- Events before “Show more” — how many events show at first (3 to 24, usually 9). Guests reveal the rest with Show more. See How many events are shown.
- “See all events” button — a button under the list that opens a page of your website. See Where an event opens.
- Parts shown — Show image, Show description, Show price and Show cancelled events. Options a design does not use are hidden: Agenda has no photos or descriptions, and Calendar has no photos and no Show more.
An Events page
The quickest way to put your events on a page of their own:
-
In the Pages tab, click + Add Page.
-
Under Start with, choose Events page. Leave the Page Title empty to name the page Events in every language of your website, or type your own title.
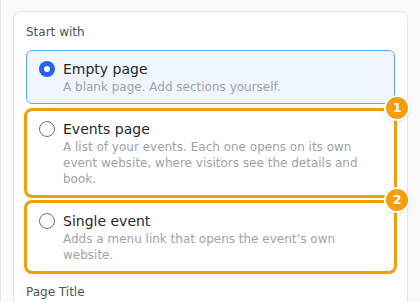
The Add Page form: Events page (1) and Single event (2) -
Click Create.
You get a page with one Event Programme section in the Agenda design, at the address /events. Every event in it opens on its own website. Change the design, texts and order afterwards, as with any section.
Good to know
Events page appears when your plan allows more than one page. Single event adds only a menu link, so it is there on every plan. See One page or several.
A link to one event in your menu
Want one special event in your menu bar? That needs a link, not a page:
- In the Pages tab, click + Add Page and choose Start with → Single event.
- Under Event, pick the event (Choose an event). Only events whose own page is switched on are offered — upcoming ones first, then past ones.
- Click Add to menu.
No new page is created. Your menu bar gets a link named after the event, and it opens the event's own website.
The link is listed in the Pages tab under your pages, in Menu links to events. There you see which event it opens — or a warning when visitors don't see it. Click the pencil (Edit link) to rename it, give it names in more languages or choose another event, then Save; click the bin (Remove link) to take it out of the menu (the event itself stays). Its place in the menu is set in Nav & Footer → Navigation Links, see The menu bar. Your menu bar holds up to 8 extra links; when it is full, the editor asks you to remove one first.
The same kind of link works in the footer: see Footer links. If the event is deleted or its own page is switched off, the link disappears from your menu by itself, and it comes back when the page is switched on again.
One-page websites
If your plan has one page only, you don't need an events page: put an Event Programme section on your home page to list your events. Each event opens on its own website.
Want a teaser only? Add an Event Details section with The next event to the home page — guests see the next evening at a glance, with a Details & booking button.
Booking and tickets
Guests book on the event's own website, not on yours. There they see the tickets and prices, fill in the reservation or registration form, and join the waiting list when the event is sold out. They get the same confirmation email as always, with a link to their reservation.
Your website shows only what helps guests choose, plus a badge when it applies:
| The event is… | Guests see |
|---|---|
| Cancelled | A Cancelled badge. |
| On now | An On now badge. |
| Over | An Ended badge. |
| Sold out | A Sold out badge. |
Whether ticket sales are open, which ticket types exist and whether there is a waiting list are shown on the event's own website.
Texts and languages
- The title, description and ticket names of an event are typed once in the Events page, in one language. Your website shows them as typed, in every language.
- Everything around them — the Details & booking button, labels, badges such as Sold out — follows your guest's language. These ready-made texts exist in English, Croatian and German; other languages show English.
- Dates and months are written in your guest's language.
- The texts you write in the section — Title, Intro Text, Small heading, Button Label — have language tabs. See Languages.
How many events are shown
An Event Programme loads at most 60 upcoming and 36 past events: the soonest upcoming ones and the most recent past ones. At first it shows as many as Events before “Show more” says (9 unless you change it); Show more reveals the next ones. Events beyond those limits are not shown — a list is meant to be a good overview, not an archive.
Try it in the preview
In the editor's preview, buttons, links, tabs and months do not react to clicks — this is the same for every section. To try them, open your draft in its own tab with Preview in the toolbar. See Open the preview in a new tab.
If a location has no events yet, the editor and the draft preview show three clearly marked sample events, so you can judge the designs. Guests never see samples: on your live website an empty Event Details stays hidden and an empty Event Programme shows its "no events" text.
The Events section
Your website has had an Events section for a while. It stays a simple list of your upcoming events, which you can also fill in by hand. Its automatic list opens each event on the event's own website, like Event Programme; open parties do too. Need past events, a calendar, or a teaser of one event? Use Event Programme and Event Details instead.