Articles in this topic
What menus are for
Where your menus show up for guests, how to find the list of menus, how the menu editor is laid out, how many menus your plan includes, and how to preview a menu before anyone sees it.
7 min read
In Menus you write each of your menus once: the courses, the dishes, the prices, the allergens, in as many languages as you need. Clava then shows them to your guests in the places below. This article shows you where to find the list of menus, how the editor is laid out, how many menus your plan includes and how to look at a menu before anyone else does.
What menus are for
| Where | Which menus appear there |
|---|---|
| Your website, in a Menu section | Menus whose Where it appears is Website, that are switched on and inside their dates — see Where a menu appears |
| The event request form on your website, where guests ask for a celebration | Menus whose Where it appears is Event Offering, if you switched on menu selection — see Let guests pick a menu |
| Your events | Menus your team adds to an event. With a set menu, the guests of the event can then choose their dishes, course by course |
The table booking form itself does not show menus. If you want guests to see your menu before they book, add a Menu section to your website.
Important
Showing menus on your website needs the Pro or Ultimate plan (or your free trial). On the Free plan you can still build menus here, but the Menu section of your website says No menus available. See Menus and your plan.
Open Menus
Menus are part of Configuration, the area for administrators. Editors and readers can't open it — see Team roles.
- Sign in. If you are not in Configuration, click the orange button at the top right and choose it.
- In the menu on the left, under Venue Content, click Menus.
The list of menus
The page opens with the list of all menus of your business — every location together.
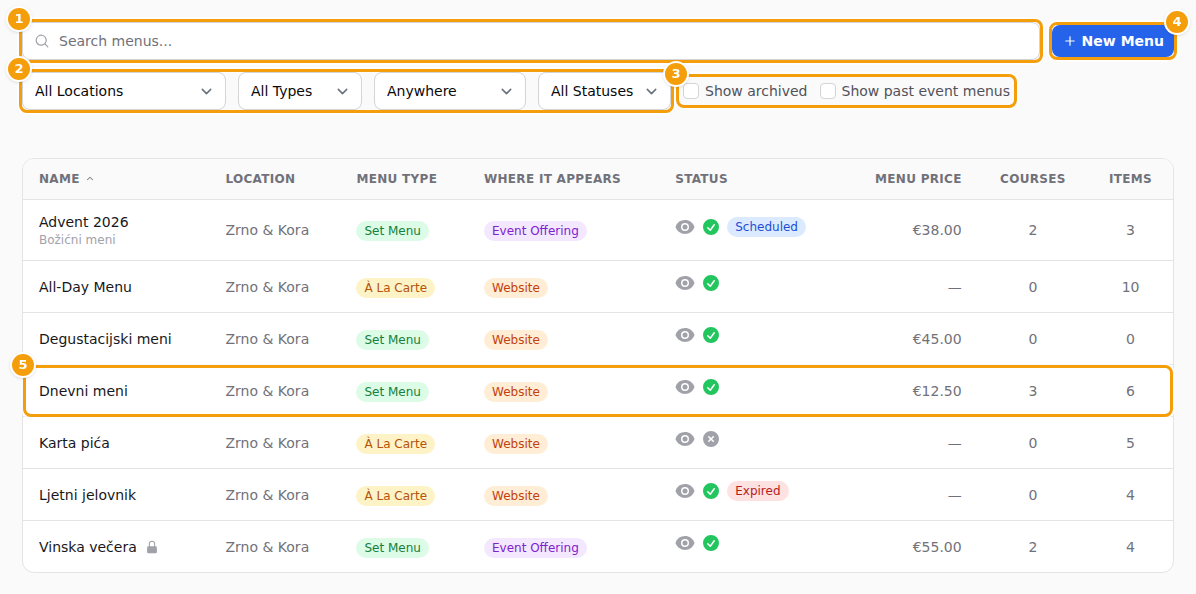
- (1) Search menus... — type a part of a name. It looks at the name guests see and at the working title (see Name and working title). The list updates while you type.
- (2) Four filters: All Locations, All Types, Anywhere and All Statuses. Choose one to see only those menus. The third one is the filter for Where it appears: Website, Event Offering or Event Specific.
- (3) Two check boxes. Show archived adds the archived menus, which are hidden otherwise (Archive a menu). Show past event menus adds the menus that were made for one event that has already happened.
- (4) New Menu — see Create a menu. If your plan has a limit, a hint such as 1 of 1 menus on your plan stands next to it — see Menus and your plan.
- (5) A menu. Click anywhere on its row to open it. If a menu has a working title, that is shown first, with the public name in grey underneath.
Good to know:
- The columns are Name, Location, Menu Type, Where it appears, Status, Menu Price and the number of courses and items.
- As soon as a filter or a check box is in use, a Clear Filters button appears. If nothing matches, the list says No menus match your filters.
- Click the headings Name, Menu Type or Menu Price to sort the list. Click again to turn the order around.
- The list shows 15 menus per page; the page numbers are under the list.
- On a phone the table becomes a list of cards. Tap a card to open the menu.
- The Status column holds a few small buttons — see Status and dates.
Open a menu
Click a menu in the list. It opens in the editor.
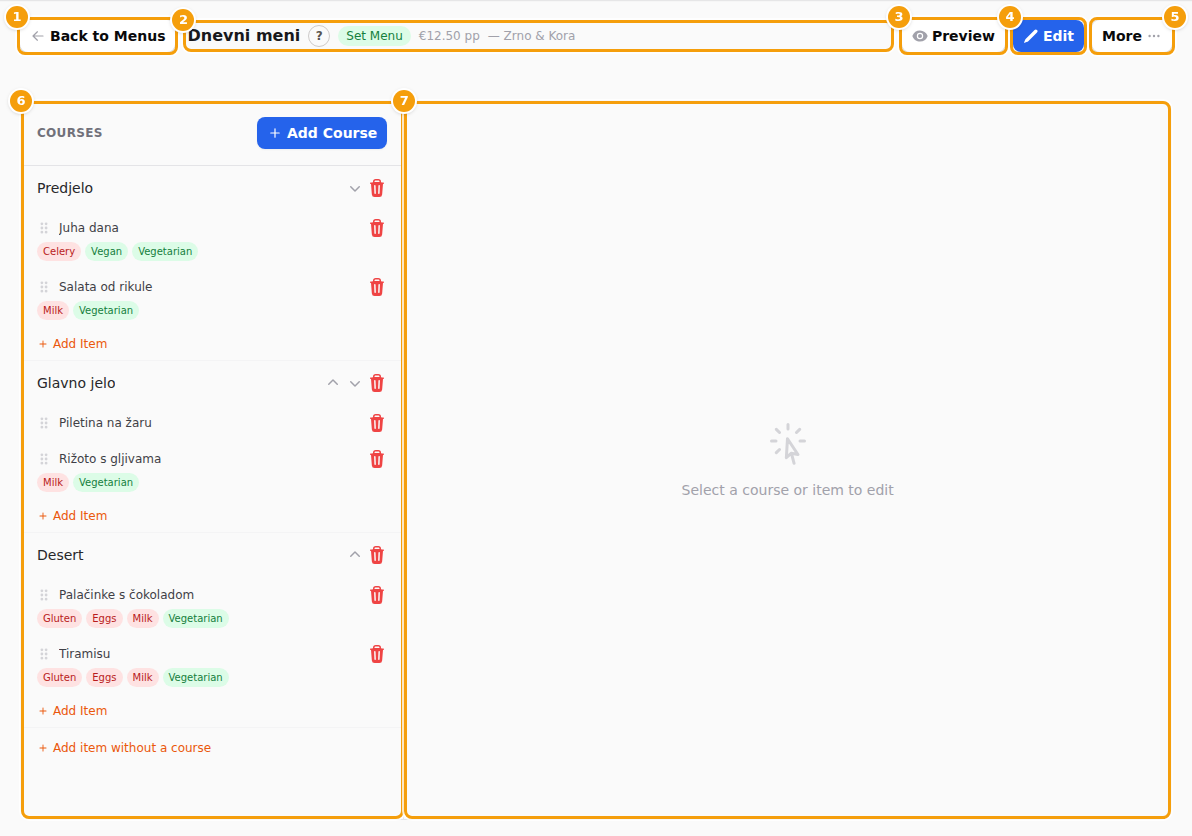
- (1) Back to Menus takes you back to the list. It does not ask about unsaved changes, so save what you typed first.
- (2) The name of the menu, its type, the price per person and the location. A small lock shows when the menu is locked.
- (3) Preview shows the menu the way guests see it — see below.
- (4) Edit opens the menu's own details on the right: name, location, type, price, where it appears, status, dates, description and languages.
- (5) More opens a small list: Lock, Deactivate (or Activate), Duplicate and Delete.
- (6) The courses and dishes of the menu. This is where you build the menu — see Courses and dishes.
- (7) The edit panel. It shows whatever you clicked on the left: the menu, a course or a dish. Until you click something it says Select a course or item to edit.
Careful
Every form has its own save button. When you open something that already exists, the button stays grey until you change something. If you click another course or dish while a form has unsaved changes, Clava asks Unsaved Changes — choose Save & Continue, Discard Changes or Keep Editing. Back to Menus and leaving the page do not ask.
See how a menu looks
Click Preview (3) in the editor. In the list you find the same thing as a small eye icon in the Status column. A window opens with your menu in the same designs the Menu section of your website uses.
- Design — choose Accordion, Tabs, Cards or Elegant List.
- Language — appears only when the menu has more than one language. Choose the language to read the menu in — see Menus in several languages.
- Allergens and Dietary — tick or untick them to show or hide the small tags under each dish. On the Free plan there is no Allergens box, because allergen labels are not part of that plan — see Menus and your plan.
The preview uses the colours and the font of your website. Close it with the x at the top right: nothing is changed.
Good to know
The preview has its own Dietary box. On your website the dietary tags appear only when the Show Dietary Preferences switch of the Menu section is on — see Allergens and dietary tags.
What your guests see
On your website the Menu section lists your menus, in the design you chose in the website editor. A guest sees the name and the description of each menu, the courses, the dishes with their descriptions and prices, and — for a set menu — the price per person.
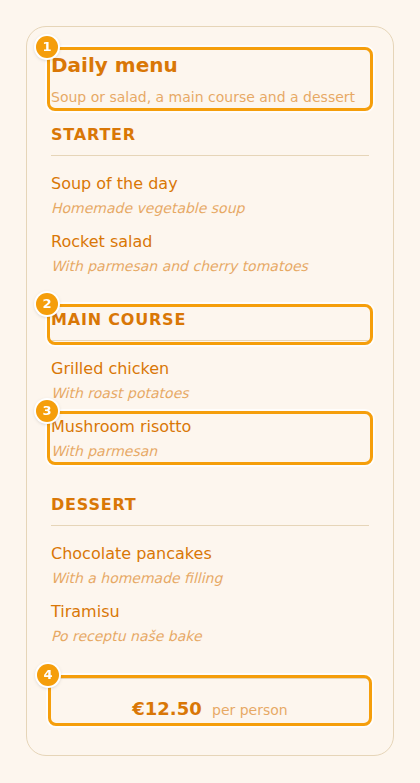
- Prices are shown in the currency of the location and written the way the language of the page writes amounts — for example €12.50 in English and 12,50 € in Croatian and German. You choose the currency in Venue Setup.
- If a menu has an Available from or Available until date, a line such as Available from … to … is shown above it — see Show a menu only between two dates.
- In the website editor, the Menu section has a list Select Menus. It lists only the menus whose Where it appears is Website. Tick the menus you want, or tick none to show all of them. It also has three switches: Show Prices, Show Allergens and Show Dietary Preferences. Allergens and dietary tags appear on the website only when their switch is on. See Add a section.
- Without allergen labels on your plan, the Show Allergens switch is greyed out and a note says that allergen labels are not included in your plan — see Menus and your plan.
- The texts appear in the language your guest has chosen on your website, as far as you have translated them — see Menus in several languages.
- A change to a menu shows on your website at once. You do not have to publish the website again. Only a change to the Menu section itself — adding it, choosing other menus in it or changing its switches — must be published.
Menus and your plan
How many menus you can keep, and a few of the menu features, depend on your plan.
| Free | Pro | Ultimate | |
|---|---|---|---|
| Menus you can keep | 1 | 10 | No limit |
| Menus shown on your website | No | Yes | Yes |
| Allergen labels on dishes | No | Yes | Yes |
What counts towards the limit:
- All your menus count, except archived menus and menus made for one event (Event Specific). So archiving a menu you no longer use frees a place — see Archive a menu.
- If your plan has a limit, the list shows how much of it you use next to New Menu, for example 1 of 1 menus on your plan. On a plan without a limit there is no such hint.
When you are at the limit, New Menu, Duplicate and bringing a menu back from the archive do not go ahead. Instead a message says You have reached the limit for this feature on your current plan., with a second line that names your limit — for example You have reached the limit of 1 on your current plan. Upgrade to increase your limit. Archive or delete a menu you no longer need, or upgrade your plan.
Allergen labels need the Pro or Ultimate plan. On the Free plan:
- the dish form shows a locked note — Allergen labels on menu items are available on Pro and Ultimate plans. — instead of the allergen check boxes;
- a dish keeps the allergens it already has, but they are not shown;
- the Preview has no Allergens box;
- your website shows no allergen tags, and the Show Allergens switch of the Menu section is greyed out.
Showing menus on your website needs the Pro or Ultimate plan too. On the Free plan the Menu section of your website says No menus available.
Good to know
- A menu belongs to one location. If you have several locations, create the menu for each one, or copy it — see Copy an existing menu.
- Delete cannot be undone. If you only want a menu out of sight, switch it off or archive it — see Status and dates. Archiving also frees a place on your plan.
- A new menu is Active from the first second. See What happens right after you save. A copy of a menu is the other way round: it starts Inactive.