Articles in this topic
Courses and dishes
Build the inside of a menu — add courses, add dishes with prices, descriptions, allergens and dietary tags, and put everything in the right order.
7 min read
A menu is built from courses — Starters, Main courses, Desserts — and the dishes inside them. In the screen a dish is called an item. This article shows how to add them, how to describe each dish for your guests and how to put everything in order.
How a menu is built
Open a menu (see Open a menu). The left side lists its Courses, each with its dishes underneath. Whatever you click opens on the right.
- A set menu is built from courses. Guests of an event choose one dish from each course.
- An à la carte menu can use courses as headings, or just be one long list of dishes.
- Dishes that belong to no course are listed under Items without a course.
Good to know
On a set menu, put every dish into a course. At an event, guests choose from the courses, so a dish without a course is not offered for choice.
Add a course
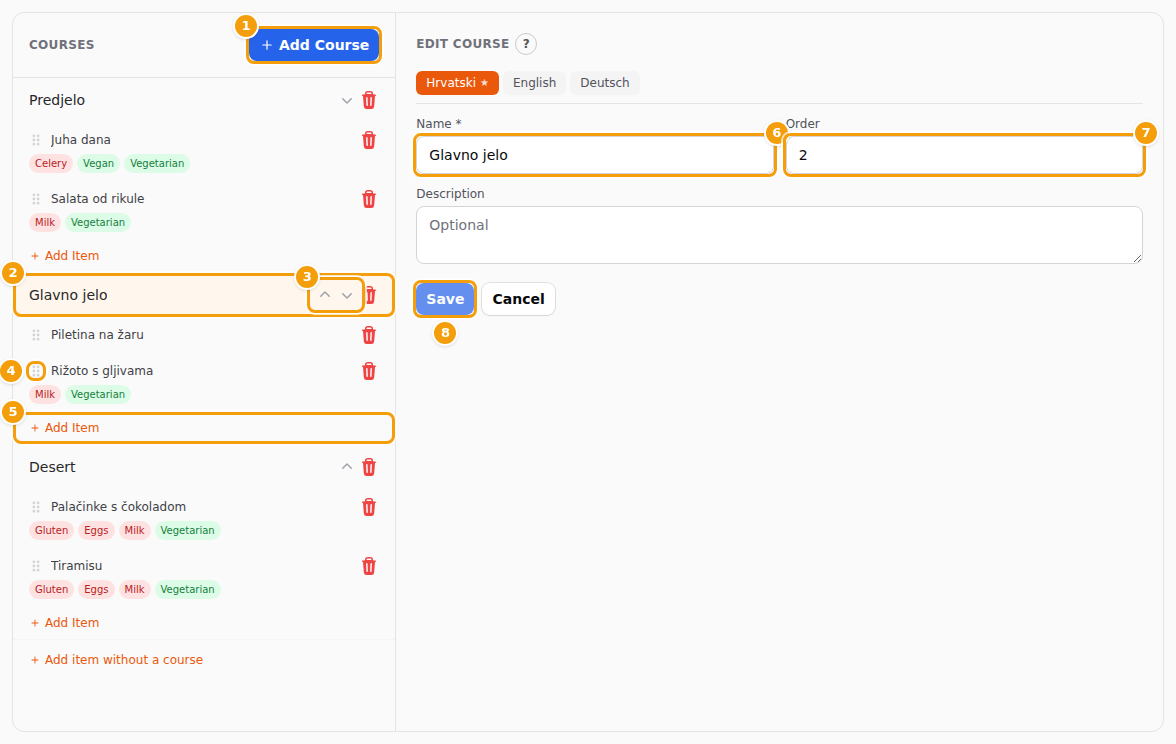
- Open the menu and click Add Course (1) above the list.
- On the right, type the Name (6) of the course, for example Starter. It is required.
- In Order (7), type the position of the course: 1 for the first course, 2 for the second, and so on. Lower numbers come first.
- Optionally add a Description, for example Choose one.
- Click Save (8). Course added. appears and the course is in the list.
Tip
A new course gets the next free number, so it goes after your last course. To put it somewhere else, type its position, or move it afterwards with the arrows (3).
To change a course, click it (2), change the form and click Save. Course updated. confirms it. If the menu has more than one language, the form has a tab for each language — see Menus in several languages.
Add a dish
- Under the course, click Add Item (5). For a dish without a course, click Add item without a course at the bottom of the list.
- Fill in the form on the right (see the picture).
- Click Add Item (6). Item added. appears and the dish is in the list.
- To add the next dish, click Add Item under the course again.
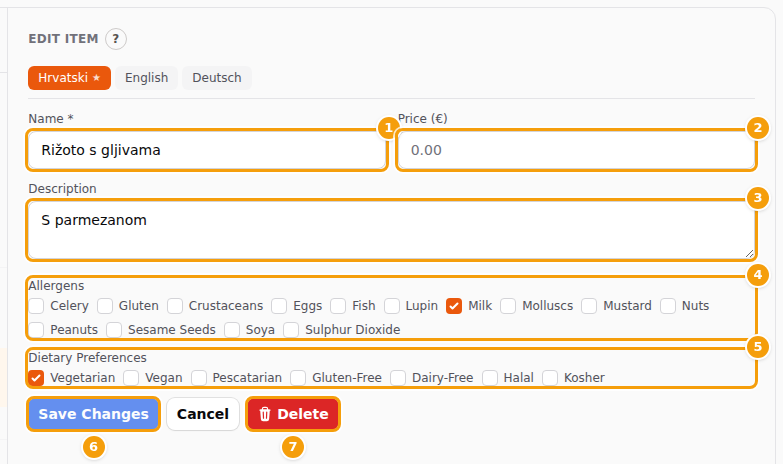
- (1) Name — the name of the dish. Required: otherwise a red message says Item name is required.
- (2) Price — in the currency of the location. On a set menu the menu price covers everything, so leave the dish prices empty. On an à la carte menu every dish has its own price. A dish without a price is shown without one.
- (3) Description — a short line under the name, for example With parmesan.
- (4) Allergens — see Allergens and dietary tags. On the Free plan this box is replaced by a locked note.
- (5) Dietary Preferences — see Allergens and dietary tags.
- (6) For a dish that already exists the button reads Save Changes, and it stays grey until you change something.
- (7) Delete removes the dish — see Delete a course or a dish.
You cannot move a dish to another course. Add it again in the right course and delete the old one.
Allergens and dietary tags
Under Allergens you tick everything a dish contains: Celery, Gluten, Crustaceans, Eggs, Fish, Lupin, Milk, Molluscs, Mustard, Nuts, Peanuts, Sesame Seeds, Soya and Sulphur Dioxide. Under Dietary Preferences you tick what the dish is: Vegetarian, Vegan, Pescatarian, Gluten-Free, Dairy-Free, Halal or Kosher.
Allergens show as red tags and dietary preferences as green tags under the dish in the list.
Important
Allergen labels are part of the Pro and Ultimate plans. On the Free plan the dish form shows a locked note — Allergen labels on menu items are available on Pro and Ultimate plans. — instead of the allergen check boxes. A dish keeps the allergens it already has, but they are not shown in the list, in the preview or on your website. The plan does not affect Dietary Preferences. See Menus and your plan.
What your guests see on your website is decided in the website editor, in the Menu section — see Add a section:
- Allergens appear only when the plan has allergen labels and the Show Allergens switch is on. Without allergen labels on your plan the switch is greyed out, with a note that allergen labels are not included in your plan.
- Dietary preferences appear only when the Show Dietary Preferences switch is on.
Guests of an event see the allergens under each dish when they choose.
The Preview has its own boxes, Allergens and Dietary, to try both with and without the tags — see See how a menu looks.
Important
Clava shows exactly what you tick. Check every dish carefully: you remain responsible for the allergen information your guests rely on.
Put things in order
- Courses: click the small arrows (3) in the row of a course to move it up or down. The first course has no up arrow, the last has no down arrow. You can also change the number in Order and save.
- Dishes: point at the dotted handle (4) in front of a dish, press, drag the dish up or down inside its course and let go. The new order is saved at once.
Dishes stay inside their course: you cannot drag a dish into another course.
Change or delete a course or a dish
- To change a course or a dish, click it in the list, change the form on the right and click Save or Save Changes.
- To delete it, click the red bin in its row, or Delete in the form of a dish.
- Confirm in the window Confirm deletion. For a course it asks Delete this course and all its items? — the dishes of the course are deleted with it. For a dish it asks Delete this item?
Careful
Deleting a course deletes all the dishes in it too. They are not moved to Items without a course. If you want to keep a dish, add it again in another course first.
This cannot be undone from Clava. If you click another course or dish while a form has unsaved changes, Clava asks Unsaved Changes: choose Save & Continue, Discard Changes or Keep Editing.
Good to know
On a locked menu the buttons for adding, moving and deleting are hidden, and saving says This menu is locked and cannot be edited. Unlock the menu first — see Lock a menu.